
 0
0
 0
0
By Mike Stines, Ph.B
Recipes:
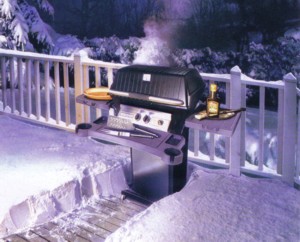
This is Part 1 of a Two-Part Series on Wintertime Outdoor Cooking. Part 2 is here.
For those in the northern climes, smoking season ends with the arrival of cold weather. A lot of folks pack up their grills and smokers in October and leave them forsaken until March or April, when temperatures begin their slow climb above freezing. Enthusiastic – or fanatical, depending on your viewpoint – backyard cooks use their outdoor cookers throughout the year, regardless of the weather.
The Hearth, Patio & Barbecue Association reports that nearly 60 percent of charcoal grill owners and 69 percent of gas grill owners in a recent survey cook out year-round— demonstrating that outdoor cooking is no longer limited to the warmer months. But grilling and cooking barbecue during the winter does require a bit of extra preparation and effort.
First of all, the cook needs to be properly attired for frosty weather: insulated socks (or battery operated hunter’s socks), thermal boots, a warm jacket or insulated parka, and a knit cap make cold-weather cooking almost bearable. Having a propane-fired patio heater, a fire pit or a well-stoked chiminea in the cooking area also helps to moderate very cold temperatures.
Having the right equipment also helps. Ceramic cookers such as the Grill Dome, Big Green Egg or Kamado Joe have thick walls that retain heat much better than a kettle-style steel charcoal grill. If you’re using a bullet- or kettle-style smoker, fashion an insulating blanket from foil-backed insulation available at your local home center or a welding blanket to wrap the smoker. Just be sure to leave the vents uncovered.
Here are some tips for cooking in less than ideal weather:
- The smoker will take longer to preheat when the temperature drops below 45 degrees F. Figure at least 30 minutes for a charcoal grill or smoker and 20 minutes for a gas-fired grill to come up to cooking temperature.
- Adjust the cooking time to compensate for lower temperatures. Figure another five to 10 minutes for every five degrees below 45 degrees F. ambient temperature.
- Add another 15 minutes of cooking time every time you open the lid to add more fuel or wood.
- Shield the smoker from the wind but don’t use it in an enclosed area or under a porch overhang. Wind has a greater impact on cold-weather cooking than actual ambient temperature. The set-up I use works well year-round, as my three primary cookers – a Grill Dome ceramic cooker, a Weber Smoky Mountain bullet smoker and a Broilmaster P3 propane grill – are on a brick patio right outside of the kitchen door. The patio is surrounded by a four-foot hedge on two sides and the kitchen and an enclosed sunroom on the other sides. Although the hedge loses its greenery during the winter, it still provides some protection from the wind.
- If you’re using a drip pan for smoking, fill it with boiling water. The hot water will help raise the grill temperature and help stabilize the temperature. Put the empty drip pan in the smoker and then add water from a tea kettle instead of trying to carry a tray filled with hot water to the cooker.
- Placing ceramic fire bricks in the cooker will add thermal mass and help compensate for the loss of heat when the cover is opened.
- The best foods to cook during the winter months are ones that don’t need much attention: roasts, whole chickens, ribs, pork shoulders and briskets. That being said, use all of the available cooking area by cooking side dishes along with the entrée. After all, you’ve already fired up the grill; you might as well use all of it!
- Make sure the meat is properly cooked. Use a remote-reading thermometer so you don’t need to stay out in the cold. If you have an Android or iPhone, iDevices makes the Bluetooth-compatible iGrill, which will send temperatures to your phone up to 200 feet away. Maverick Housewares offers the ET-732 remote-reading thermometer that will transmit to a remote receiver up to 300 feet away. Both units are battery operated so in very cold weather the batteries will have a shorter life.
- As the meat gets closer to being ready, use an instant-read thermometer (I recommend the Thermapen) to check the temperature. Poultry should be cooked until the thigh meat is 165 degrees F. and beef to a minimum of 125 degrees F. for rare or 145 degrees F. for medium. (Briskets and pork shoulders need to be cooked to a higher temperature to make the meat tender.) Pork roasts should be cooked to 145 degrees F. (Remember, the internal temperature will rise five to ten degrees as the meat rests before carving.)
- Expect to use more fuel during colder weather. To be safe, estimate on using twice as much charcoal as you would during the warmer months. Be sure to have an adequate supply on hand. To maintain the temperature of a charcoal grill, use long-handled tongs to add 10 to 12 pieces of lump charwood to the edges of burning coals every 30 to 45 minutes.
- Try to do your cooking when the outside temperature is highest, such as during the middle of the day.
- Do a lot of cooking at the same time. Prepare several entrées that can be stored and served when the weather is really bad and you don’t want to venture out to the cooker but still crave barbecue.
- Use a heated platter to transfer the cooked food from the cooker to the kitchen. Don’t put hot food on a cold plate.
With a little advance planning and the right equipment, outdoor cooking in December, January and February is just as rewarding and tasty as a summer-time cookout. Plus, you don’t have to worry about mosquitoes!
Mike Stines, Ph.B. is the author of Mastering Barbecue, a compendium of barbecue tips, techniques, and more than 250 recipes. A resident of Cape Cod, Massachusetts, he is a culinary instructor, a food writer, and professional chef. He is a Kansas City Barbeque Society certified judge and table captain.

| Servings |
| 4 servings |
|
|
|
|
A whole beef brisket – the point and the flat – is a large piece of meat usually weighing eight to 16 pounds that can take 12 to 20 hours to cook. By using the flat instead of an entire brisket the cooking time is greatly reduced, making it a good choice for winter cooking. (This recipe does require advance preparation.)
|
- 2 cups mesquite wood chips
- 2 cups hickory chips
- 1 3 1/2 lb brisket flat
- 2 tbsp cracked black pepper
- 1 tbsp coarse kosher salt
- 1 tbsp chili powder
- 1 tbsp hot Hungarian paprika
- 1 tsp granulated garlic
- 1 tsp granulated onion
- 1 tsp dried parsley
- 1 tsp dried oregano
- Trim the fat cap to 1/4-inch and score the remaining fat. Combine the rub ingredients in a small bowl. Using a pastry brush, lightly coat the brisket with yellow mustard.
- Rub the spice mixture evenly over the meat. Put the brisket in a one gallon resealable bag and marinate, refrigerated, at least six hours or up to overnight.
- At least one hour before cooking, bring the meat to room temperature.
- For a charcoal grill, arrange medium-hot coals on both sides of a drip pan. Pour 1 1/2 inches of very hot water into the pan. When the grill reaches 225 degrees F., sprinkle half of the wood chips over the coals. Place meat on grill rack over the drip pan, fat side up. Cover and smoke about one to 1 1/2 hours per pound or until meat thermometer registers 185 degrees F. Add the remaining wood chips (and more pre-lit coals if necessary) halfway through smoking.
- For a gas grill, preheat the grill using all the burners. Turn all but one burner off and reduce heat to medium on the remaining burner; add half of the wood chips to a smoker tray over the burner in use. (I like to use the Amaz-N-Tube Smoker.) Place the brisket on cooking grate over the drip pan, fat side up, and indirectly cook as above adding more chips halfway through the cook.
- Remove the brisket from the grill. Bring the meat into the kitchen and cover with foil; let stand for 10 to 15 minutes before carving across the grain into 1/4-inch slices.

| Servings |
| 2-4 servings |
|
|
|
|
An elegant presentation but easy to prepare even in the dead of winter…A perfectly roasted chicken, tender and juicy, with crispy skin makes a wonderful Sunday dinner when accompanied with roasted garlic mashed potatoes and a green vegetable or tossed salad.
|
- 1 5-lb roasting chicken
- 2 tbsp olive oil
- 3 tbsp Cajun spice
- 1 tbsp crushed rosemary
- 2 each carrots, peeled and chopped
- 2 each yellow onions, peeled and chopped
- 2 stalks celery, chopped
- 2 cups chicken stock
- 1 tbsp whole black peppercorn
- Preheat the grill to medium high (375 degrees F) and set up for indirect cooking.
- Remove the “goodies” from inside the chicken (and the pop-up thermometer if there is one). Rinse and dry the chicken thoroughly with paper towels. Rub olive oil over outside of chicken. Rub the Cajun spice and crushed rosemary all over the outside of the chicken.
- Put the chopped vegetables in the bottom of a roasting pan. Add two cups of chicken stock and the peppercorns. Put the chicken on a roasting rack in the pan, put the pan on the unheated side of the cooking grate, and roast for 20 minutes per pound or until the thigh has an internal temperature of 165 degrees F.
- Let the chicken rest for 10 minutes before carving.

- 2 large turnips, peeled and cut into one-inch cubes
- 1 lb beets, peeled and cut into one-inch cubes
- 2 large (chef's) carrots, cut into 1/2-inch rounds
- 1 large onion, peeled and roughly chopped
- 6 small red bliss potatoes, cubed
- 3 tbsp olive oil
- 11/2 tbsp fresh thyme (or two teaspoons dried)
- 1 tbsp fresh rosemary
- Combine the vegetables in a medium mixing bowl. Drizzle with olive oil and season with thyme, rosemary, salt and pepper. Toss well to coat.
- Make a packet of heavy duty aluminum foil large enough to hold the vegetables and seal tightly. Place the packet on an indirect grill and cook for one to 1 1/2 hours or until the vegetables are fork-tender.

| Servings |
| 4 people |
|
|
|
|
While this roast could be prepared in an oven, smoking it over apple and cherry wood adds another dimension of flavor to compliment the peppercorn and mustard glaze. A boneless pork loin could also be substituted for the bone-in sirloin roast. (This entrée does require some advance preparation; be sure to read all the recipes before proceeding as some of the steps are interrelated.)
|
- 1 5-lb bone-in pork sirloin roast
- 4-5 cloves garlic
- 2-3 tbsp Dijon mustard
- 2 tsp brown sugar
- 2 tsp dried thyme
- 1 tbsp black peppercorn
- 1 tbsp green peppercorns, drained
- 1 tbsp pink peppercorns
- 1 tsp yellow mustard seeds
- 1 1/2 tsp coarse kosher salt
- 4 tbsp pork fat, divided
- 2 medium yellow onions, thinly sliced
- 2 tbsp flour
- 2 1/2 cups apple cider
- Trim excess fat from roast, reserve. Peel garlic cloves and slice into slivers. Using a sharp paring knife, cut into the pork roast in several areas and insert slices of garlic at varying depths. (If desired, the roast may be tied between the bones to help retain its shape during cooking as the outer layer tends to separate from the rib-eye muscle.) Brush Dijon mustard onto the meat.
- Using the side of a chef’s knife, a rolling pin, or a small spice grinder coarsely crack peppercorns and mustard seeds. In a small mixing bowl, combine brown sugar, thyme, peppercorns, mustard seeds and salt. Liberally apply rub to roast. (If desired, the roast could be prepared to this point one day ahead and held, wrapped in food film and refrigerated.) Allow the roast to come to room temperature before cooking.
- In a small saucepan, melt pork fat over medium low heat until fat renders, about 10 to 15 minutes, being careful not to allow the fat to burn. Remove cracklings, reserve if desired. Strain fat and reserve. (Depending on the amount of fat, it should render to about 1/3 to 1/2 cup.)
- Fill the Grill Dome firebox with hardwood lump charcoal and light the charcoal. Allow the temperature to stabilize at 360 degrees F. to 370 degrees F. (This will take about 30 to 45 minutes depending on the size of your Grill Dome and the amount and type of fuel. For my Grill Dome, the bottom vent should be open about 1/2 to 3/4 of an inch and the top vent about 10 percent to maintain the desired temperature.) Add two pieces of apple wood and two pieces of cherry wood to the charcoal.
- Chef’s note: I installed a BBQ Guru Competitor power draft on the Grill Dome to regulate the fire although ceramic cookers, once stabilized, will hold temperature for quite some time without using a power draft unit. For my cooker, I clipped the grate probe onto the cooking grate next to the roast and inserted the “meat set point” probe into the roast, being careful not to touch any bone. Set the “meat set point” temperature alarm to 150 degrees F. and the “pit set point” regulator to 350 degrees F.
- Place the pork on the cooking grate and roast 25 to 30 minutes per pound (about 2 1/2 to three hours) or until the pork has an internal temperature of 145 degrees F. Remove the roast from the grill and bring it into the kitchen. Tent with aluminum foil and let stand for 10 to 15 minutes before slicing.
- In a partially covered saucepan over medium heat, reduce 2 1/2 cups of apple cider to 1 1/2 cups, about 15 to 20 minutes. In a medium sauté pan over medium heat, heat two tablespoons of pork fat and cook onions until caramelized, about eight to 10 minutes (a pinch of granulated sugar will help caramelize the onions). Remove from heat, remove onions and reserve (do not clean pan, it will be used later to prepare the gravy).
- Using the same sauté pan as for the onions, melt two tablespoons of pork fat (or unsalted butter) over medium high heat; add flour and cook, stirring constantly, to a blonde roux. Add reduced cider, reduce heat and simmer for three to four minutes Add two-thirds of the sautéed onions (reserve remaining onions for garnish). Return gravy to a simmer and cook for two to three minutes. (The gravy may be prepared ahead and held, refrigerated, for up to two hours. If the gravy is too thick, thin it with some apple cider or chicken stock.)
Related Articles
Stovetop Smokin’ by Mike Stines, Ph.B. for when it’s snowing too hard to go outside.
Mastering Ceramic Cookers by Mike Stines, Ph.B.
A Smoking Primer by Mike Stines, Ph.B.
00

