

 0
0
 0
0
|
|
|
||||||
The oldest, easiest, and most common way to preserve chiles is to dry them. Aside from a few of the thick-walled, meaty varieties such as jalapeños, most chiles are well-preserved by drying them at home. There are several different ways to dry chiles, employing both traditional methods and new technologies.
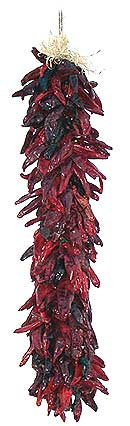
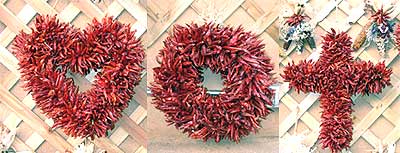
Ristras
The ristra, or chile string, is the oldest and also the most attractive method, and it is still customary in many chile-producing countries. There are several different ways of assembling these strings.
|
|
|
Ristras from New Mexico (L), |

Making Ristras
Traditional New Mexican ristras are made by tying New Mexico red chiles together in clusters of three, with cotton string (this works with various other chiles as well).
Start by wrapping the string around the three stems a couple of times, then bring the string up between two of the chiles, and finish off with a half-hitch over the stems. Continue using the same piece of string, tying up groups of three chiles until it gets too awkward to handle. Just cut the string and start again. To make a 36″ ristra will require around 15 pounds of fresh red pods.

When all the chiles have been strung by threes, they then get braided onto a length of strong twine or wire. Hanging the twine from an overhead support greatly simplifies this stage of assembly. Braid the chiles from the bottom of the twine as if braiding hair, using the twine as one braid and chiles from each grouping as the other two. Be sure to push each group down tightly against each other to insure an attractive, full-bodied ristra.
|
|
Following the above steps and using
|

These days, some ristra makers have resorted to using rubber bands to “tie” up the groups of three chiles, then slipping each group over a wire to form the ristra. This method is considerably faster than the traditional method; the downside is that the ristras tend to be a bit thin or skinny and last only as long as the rubber bands hold out.
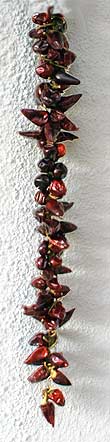
One final method to make a ristra is to use a large needle threaded with string. Push the needle through the bottom of the stem where it widens out, pushing the chiles up tightly against each other. Again this tends to produce thin looking ristras, but this can be overcome by hanging several strings together. It is also a handy way to handle smaller chiles such as cayennes or piquins, which require a lot of time and dexterity to string in the traditional way.
|
Professional ristra maker
|
|

Unless you live in an arid climate, it is important to dry your ristras in a location where the air circulates freely. If hung inside a home in a damp climate, there is a good chance that some of the chiles will rot. Hung from a tree, or in an open porch should give the ristra a good chance to dry properly. If a few of the chiles do start to rot, just pull them off the string; if you’ve got a nice full ristra, you’ll never miss them!
|
|
Especially smaller chile varieties
|
Another good reason to dry your ristra outside is that if any of the chiles start to rot, they may start dripping a liquid that will stain anything it touches. (After all, red chiles are used to produce red coloring that is used in food products.) So you might want to reconsider before hanging your fresh ristra over your 2-inch deep, snow white pile carpet. And one final disturbing note: chiles that turn bad attract fruit flies by the zillions. Obviously, it makes a lot of sense to hang them outside to dry!
Other Drying Methods
Another way to dry chiles, and in fact, nearly the only way to dry some of the thick fleshed chiles, is to use a food dehydrator. As we mentioned earlier, jalapeños and several other chiles simply will not air dry. They will, however, dry well in a dehydrator. Simply place them in a single layer on the racks and follow the instructions for your model. Cutting the thick fleshed chiles in half, or into several pieces helps to speed up the process.
|
|
Orange and Caribbean Red Habaneros,
|

Many people think that drying in an oven is just as effective, which unfortunately, is not always the case. Dehydrators supply not only heat, they also constantly circulate air through the unit. Ovens usually supply only heat, which means that meaty chiles could possibly spoil, rather than dry.
If you do use an oven, use the lowest possible heat. Cut the chiles in half, remove the seeds, and place on a baking tray. Check the chiles every hour or so to make sure they are not burning. When they are brittle, they are ready.
It’s possible to dry chiles in a microwave oven. By chopping the chiles into small pieces and microwaving them in small quantities, chiles can be dried in no time at all, especially the smaller, thin-fleshed varieties. However, this method will not work for whole pods.
Roasted and peeled fresh green New Mexico chiles can also be dried, and, in fact, drying fresh green was the only way to preserve it in the days before freezers. See the recipe which follows. A word of warning: don’t get upset by the appearance of the dried green since it turns black and looks more like road-kill than anything you’d want to eat! However, when rehydrated, it plumps up, turns almost green, and is extremely tasty.
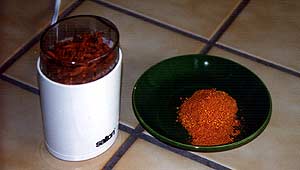
Making Powders
All dried chiles can be ground into powder–and most are, including the habanero. Crushed chiles, or those coarsely ground with some of the seeds are called quebrado. Coarse powders are referred to as caribe, while the finer powders are termed molido. The milder powders, such as New Mexican, can also be used as the base for sauces, but the hotter powders such as cayenne and piquin are used when heat is needed more than flavor.
|
|
A cheap electric coffee grinder is perfect for
|
Adventurous cooks can experiment with creating powders of specific colors. For example, collect the different varieties of green, yellow, orange, red, and brown chiles and separate them into their respective colors. The colors of the powders vary from a bright, electric red-orange (chiltepins), to light green (dried jalapeños), to a dark brown that verges on black (ancho). The colored powders can then be combined with spices, as in our recipe for Chili Powder (this chapter), or they can be stored for later use. Another use for the powders is to turn them into green, yellow, orange, red, or brown chile pastes. Since some of the colors of the powders tend to be a bit dull, they can be brightened up by adding a few drops of the appropriate food coloring when making the pastes.
In some kitchens, there are more powders available than the whole pods because the powders are concentrated and take up less storage space. Store the powders in small, airtight bottles. The fresher the powders, the better they taste, so don’t grind up too many pods. Use an electric spice mill and be sure to wear a painter’s mask to protect the nose and throat from the pungent powder. Many cooks experiment by changing the powders called for in recipes.
Chile Pasado
(Chile of the Past)
Here is the way green chile was preserved before the invention of canning and freezers. This method assumes that you live in a dry climate like New Mexico or Arizona. If not, remove the stems from the chile and place the pods in a food dehydrator until brittle. You can place them in an oven set at the lowest heat possible, but you must monitor them carefully. There are about 10 medium-sized pods to a pound.
-
2 pounds New Mexico green chile pods (about 20 pods)
-
String
Roast the chile pods on a charcoal or gas grill until the pods blister and start to turn black, turning often. Remove them from the grill and place in a plastic bag with a wet paper towel for ½ hour. Remove and carefully peel the skin off, leaving the stem and seeds intact. Tie four pods together by wrapping string around the stems and place over a line outside in the sun. Do not let the chiles get wet by rain, and you can protect them from flies and other insects with by wrapping them lightly in cheesecloth. Drying time varies with humidity levels, but dry them until they are very dark and brittle. To store, break off the stems and place the dried pods in a zip bag and then place in a second zip bag. Place in the freezer for optimum results, especially if you live in a humid climate. Because they are brittle, breaking off the stems will sometimes cause the pods to break into strips and other pieces.
|
|
Chile Pasado strips, dry (L) and rehydrated (R)
|

To reconstitute the pods, place them in a pot of boiling water for 1 minute. Remove from the heat and let stand for five minutes. Remove from the water and drain. Use them in any recipe calling for green chile in any form except whole pods.
Yield: About 3 ounces
Heat Scale: Varies but usually medium
For more Chile Pasado info, click here
00