

 0
0
 0
0
Writing and Photography by Mark Masker
About two years ago, I shelled out twenty bucks for a brand new electric smoker that a friend of mine used as a dust attractor in his garage. I cut my culinary teeth it and it lasted through two good years of ribs, briskets, and a lot of other cool dead animal flesh. Then, one day, part of the heating element melted. Buying a comparable new smoker would’ve set me back $60-$70 but I knew you could build one for about the same amount out of a metal garbage can, so I did. And who doesn’t want to see their friends eat out of a trash can? If I was going to get a new smoker, I might as well custom build it so it could double as a conversation piece.
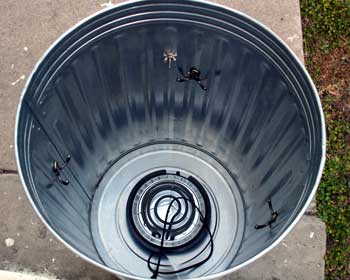
The grill rests on a set of hooks about a foot above a metal plate resting on a hot plate. I used a cheap hot plate that doesn’t generate a ton of heat. That’s fine by me. I use it for cold smoking; it’ll provide steady smoke for a long time without fully cooking the food. Cold smoking is where you provide enough heat to burn the chips but not enough to fully cook the meat (typically, under 100 degrees F). It’s a great way to add a smoked flavor to meat before grilling. My Toastmaster 6420 hot plate is a 750 Watt model. It doesn’t generate enough heat to fully cook meat unless it’s in the sun on a hot summer day. However, it does a great job of adding a deep smoky flavor to food without actually cooking it. I’m not a fan of food poisoning, so I’m a paranoid wimp when it comes to cold smoking. I usually only run food in the trash can for two hours, maximum.
Here’s how the finished garbage cooker works. I take a cup of whatever wood chips I’m using, soak them in water for a half hour, drain them, and put them on a pizza pan. With the hot plate plugged in and turned to High, I set the pizza pan atop the plate. Then, I add the grill rack with the food on it, put the lid on, and smoke the food. I’ll also change the chips every half hour to keep a continuous smoke going. Other than that, removing the lid is a serious offense because it lets all that yummy smoke escape. After a couple of hours in the trash can, I move the contents over to a charcoal grill to finish cooking.
You can use a setup like this to hot smoke too, though. Mine just doesn’t like to do that because I used a weak heating element. Hot smoking, which is what most smokers you find at places like Home Depot were made to do, is kind of like crock pot cooking only without the mandatory Man-Card revocation. Hot smoking generates enough heat to not only burn the smoking wood, but also to slow cook the food (165 to 185 degrees F). It’s a great way to save time but there’s no guarantee you’ll get nearly the richness of smoke you get from cold smoking. The process can also cause food to shrivel and burns off tasty fat. Many hot smokers are also water pan smokers—you place a pan full of hot water on hooks a few inches above the heat source. The heated water generates steam to reduce drying and keep food moist. You can also put potatoes in the water during the last hour and a half of smoking to boil and sop up the falling juices from the meat. I mean, if you’re the sort of weirdo that thinks vegetables have any place near a barbecue. Not that there’s anything wrong with that.
Construction time is about an hour, painting it is a four hour spray-and-wait process over two weekends, but that’s optional. Tool-wise, it’s a pretty basic project. You’ll need a cordless drill with various sized bits, a tape measure or ruler, crescent wrench, screwdriver, and duct or electrical tape.

I didn’t shoot a picture of the garbage can, since I figured you’ve probably seen one before (hint: it’s that thing Oscar lived in on Sesame Street). I did, however, get a shot of the guts. You’ll find most of this stuff at a hardware shop or Home Depot. A couple of these parts I transferred over from my dead smoker.
Home Depot coats the inside of its cans with protective resin, so I cleaned that out with some solvent, washed that out thoroughly, then marked some holes for drilling. I’m putting the thermometer eight inches down from the top so it sits a couple of inches above the rack. Ten 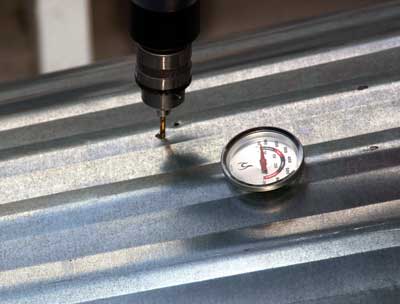 inches down from the top, I marked off holes for the hook brackets. I dotted one, then marked off two other holes equidistant from it at the same level. Then, I used the brackets themselves as templates to mark the second hole for each of them in turn. My rack is 22 inches (the one in my smoker, gutter brain); if you’re running a smaller one, you’ll want longer hooks than these. Once all the proper holes were marked off, it was drill time. I compared the diameters for the bolts on the thermometer and brackets with the sizes of my drill bits to get the right size holes, then got down to business.

But I’m still not ready to cook anything until I have a hole for the electric cord. I measured the plug width, then marked off a hole slightly larger than that on the outside. It’s best to use a power saw to cut a hole like this but if you don’t have one, you can drill a series of holes and use a pair of wire cutters to clean out the Swiss cheesed metal.
Either way, you don’t want sharp metal edges slicing through the cord on your hot plate. I wrapped my cord in a ton of duct tape to protect it.
Here’s the basic set-up, sans grill rack. I wanted some protection against corrosion inside the can so I sprayed the inside of my new toy with Krylon barbecue paint. The directions said to wait at least an hour after the last coat before cooking but I waited a day and made a three hour trial run sans food to smoke off any linger paint fumes. Next time I went at it with some tri-tip and the results were great.
 |
 |
Krylon makes barbecue paint in any color you want, so long as it’s black. Funny enough, car guys like a wide variety of colors to choose from when painting their motors.
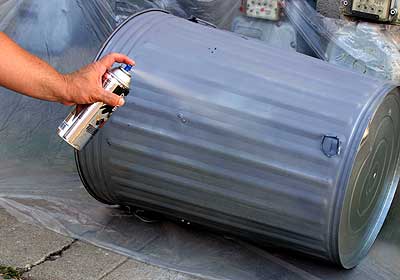
Heat-resistant motor spray paint also comes in two versions—500 degree and 1200 degree. Meat’s not happy at 1200 Fahrenheit, so I went with the 500 F which is also a third cheaper. A trip to my local auto parts joint and the Home Depot yielded everything I needed: masking paper, masking tape, primer, paint, and a cheap plastic drop cover. The Krylon paint didn’t call for primer but the motor stuff does. I washed the outside of the can and lid, then set up my painting area. You want a place that’s well ventilated but out of the wind. That way you minimize dust, control the paint, and won’t kill any (more) brain cells. I put the can on its side so I could cover it in long horizontal strokes. The first two primer coats were light to build up a tacky foundation, followed by a deeper third coating for thickness. Once the first half was coated, I let it set for an hour, then primed the rest.
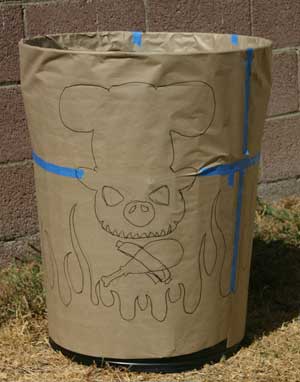
A week later, the primer was cured. I shot over it in black using the same coating procedure. Later, I taped the can up tightly in masking paper and drew on my pattern.
After that, I carefully cut away all the areas I wanted exposed for the red, taped down the edges to avoid paint bleed, and zapped down the red.
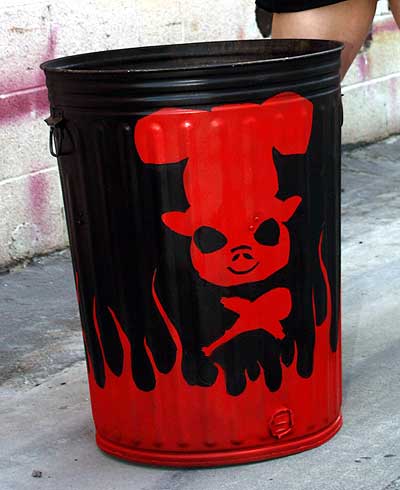
All done. I’ve had a lot of fun with the new smoker since then. Now I just need a charcoal version…
Mark Masker is a freelance journalist based out of Los Angeles. Ten years ago he fooled the motorcycle industry into thinking he could write and shoot photos. He’s now trying that same trick with the culinary arts.
Pulled Pork and Beans with Cinnamon BBQ Sauce
This recipe takes a lot of time but the end result is well worth it. Pork shoulder roasts go on sale at the supermarket all the time, so you get maximum bang for your buck. I cold smoke the pork while the beans are soaking and cooking.
2-3 lb pork shoulder roast
1 lb bag of dried red beans
Cinnamon BBQ Sauce:
8 oz cans tomato paste
8 oz water
1/2 cup apple cider vinegar
1/2 cup Worcester sauce
2 1/2 tablespoons molasses
1/4 cup packed brown sugar
1 tablespoon kosher salt
1 tablespoon cumin
1 tablespoon ground black pepper
1 tablespoon cinnamon
1 tablespoon garlic powder
1 tablespoon thyme
Soak the beans in water overnight, per the instructions on the package.
Cold smoke the pork shoulder for 2 hours over 1 cup of water-soaked apple wood chips, changing the chips every 20-30 minutes.
While the pork is smoking, rinse the beans and place on a low heat for 90 minutes, partially covered. Place the beans in a crock pot.
Blend all other ingredients except the sauce until smooth, then add to the pot and mix with the beans. Set the pork atop the beans, turn the crock pot on low, and let cook on low for 8-10 hours.
About an hour before completion, the pork should be fork-tender. Place it on a cutting board, shred it, and mix it back into the pot for the last hour of cooking.
Serves 4-6
Heat scale: mild
Tri-Tip with Five-Spice Rub
For as simple as this rub is, it goes great with red meat, especially tri-tip.
One 3 1/2-5-pound tri-tip roast
1 tablespoon salt
1 tablespoon chile powder
1 tablespoon crushed black pepper
1 tablespoon cumin
1 tablespoon mustard
1 tablespoon garlic powder
Mix all the spices in a bowl and spread the mixture evenly on a cutting board. Gently coat both sides of the tri-tip in the mixture.
When using my trash can, I cold smoke it for two hours and transfer it to a heated charcoal grill to finish cooking. You want to grill the tri-tip until it reaches 145 degrees F at its thickest point.
If you have a higher-burning hot plate, you can hot smoke the tri-tip for 2 hours or until the meat reaches 145 degrees F at its thickest point instead of grilling it. Hot smoke for 2 hours or until the meat reaches 145 degrees F at its thickest point.
Let it rest for 20 minutes, then slice against the grain and serve. Black cherry wood chips complement beef wonderfully. If you want a deeper flavor, you can cold smoke it for 3 hours instead and finish it off on a hot grill.
Serves 4 to 6
Heat scale: medium
Smoked Apples Over Ice Cream
While you’ve got the smoker going, why not throw on dessert after the main course? Apples smoke in 45-90 minutes. They should be ready just about the time dinner has settled and guests are ready for the final round.
6 large tart apples, peeled, cored, and sliced
¼ cup sugar
3 tablespoons melted butter
1 teaspoon cinnamon
6 cups vanilla ice cream
6 wooden skewers
Soak the skewers in water for 30 minutes. Place the apple slices on the skewers and smoke for 45-60 minutes. I cold smoke them but you could hot smoke them for 30-45 minutes instead if you want the apples to be cooked.
Remove, then mix with the remaining ingredients (except for the ice cream). Spoon the apple mixture over the vanilla ice cream scoops.
Serves 6
Heat scale: mild
00