By Dave DeWitt and Paul W. Bosland
Photos by Harald Zoschke and Dave DeWitt
Excerpted from The Complete Chile Pepper Book
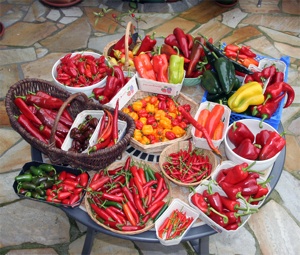
We love chiles in whatever form we can get them, but there is something special about fresh chiles—they have a flavor and texture that cannot be duplicated by canned, dried, or frozen chiles, and they bring bright colors to summertime meals. So naturally, the first way to handle a mega harvest, is to consume as many of the fresh chiles as possible.
There are many ways to use fresh chiles straight from the garden. Obviously, they can just be eaten raw, although many of the really hot varieties such as bird peppers and members of the chinense species are simply too hot to be eaten by themselves. But the larger, milder ones can be sliced up for use in sandwiches as well as on hot dogs and burgers. They can also be added to salads of all kinds.
The poblanos and New Mexican varieties have tough skins that are usually blistered and peeled before being used in recipes that require cooking. Blistering, or roasting the chile is the process of heating the fresh pods to the point that the transparent skin is separated from the meat of the chile so it can be removed.
To roast and peel pepper pods, first cut a small slit in the pod close to the stem end so that the steam can escape. The pods can be placed on a baking sheet and put directly under the broiler, or on a screen on the top of the burner. They can also be plunged into hot cooking oil to loosen the skins, but that method is messy and not recommended.
The easiest method is to use a barbecue grill. Place the pods on a grill about five to six inches from the coals or gas flames, turning them often. Blisters will soon form, indicating that the skin is separating, but take care that the pods are blistered all over or they will not peel properly. Although the pods may burn slightly, take care that they do not blacken entirely or they will be overcooked and will be nearly impossible to peel. The idea is to use intense heat for short periods of time rather than low heat for a long time. During the charcoal roasting process, the sugar and starch caramelize in the chile, which imparts a “cooked” flavor, while a rapid roasting over high heat leaves the chile tasting more “raw.” And, during the roasting process, why not save a few perfectly formed pods and make a classic dish of chiles rellenos–stuffed peppers? Remove the pods from the grill with tongs and immediately wrap the chiles in damp paper towels and place them in a plastic bag to steam for ten to fifteen minutes. For a crisper, less cooked pepper, plunge the pods in ice water to stop the cooking process.
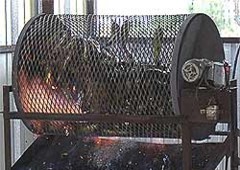
Chile Roaster
Chile roasters have become commonplace in the Southwest, and these cylindrical cages with gas jets below can roast a forty-pound sack of chile in a lot less time than it takes to roast pods on the grill. Although this method is a more convenient way to process large quantities of pods, there are some drawbacks to using a roaster. Occasionally the pods are roasted unevenly and some are difficult to peel. The pods are usually placed in a large plastic bag to steam after being roasted and must be processed as soon as they have cooled enough to handle. If allowed to sit for too long, bacterial growth can cause the pods to spoil.
After the chiles have cooled down, it’s time for the final step. If you’ve done a good job of roasting your chiles, peeling them is fast and easy. Simply start at either end, and pull off the skin, wearing gloves, of course. We generally pull from the tip back towards the stem, but it depends on the roasting job. Occasionally, you will run into problems with the deep indentations, or “valleys” on the pod; it is difficult to blister those “valleys” without burning the surrounding areas. In these cases, you simply have to go in with a knife and scrape off any remaining skin.
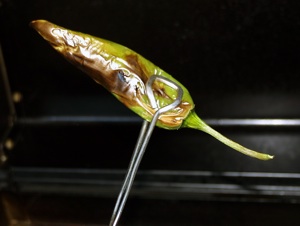
Roasted Pod
Because the hotter varieties of green chile have thinner flesh than the mild ones, it is difficult to peel them and come up with an intact pod. They tend to tear and split apart during the peeling process. If you are going to chop the chile before using, it really doesn’t matter if the pods split. If you want chiles to stuff, however, this can be a disaster. To produce intact, roasted and peeled green chile pods, simply start with mild chile pods, which have much thicker flesh.
At this point, most people like to cut off the stem and remove the seeds. The easiest method is to simply cut off the very top of the chile along with the stem, and then scrape the seeds out of the open end. If you really want to reduce the firepower, you can also remove the veins (the placental tissue) that run the length of the pod and serve to attach the seeds to the pod.) You’ve now completed the whole process and have a chile pod that is ready to eat, cook with, or freeze.
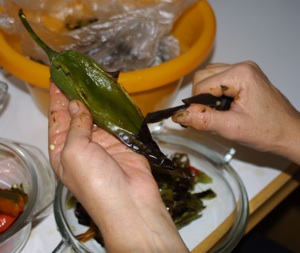
Peeling Chiles
Our readers over the years have come up with some unusual methods for removing the skins of New Mexican chiles. One person wrote to say that he used a small propane torch to blister each pod individually, and added that the flame can easily be directed into the creases. Perhaps the most unusual method sent to us was from Chris Mathews of Marquette, Michigan. He wrote: “Freeze the little buggers solid. Using a dry rag to hold one end of the frozen pepper, use a vegetable peeler to peel the skin off, then a small knife or garnishing tool to scrape in the crevices that the peeler missed.”
Iced Heat: Freezing Chiles
Freezing chiles is an excellent way of preserving them. Chiles that have been frozen retain all the characteristics of fresh chiles except for their texture. Since the individual cell walls have been ruptured by the freezing of the water within each cell, the chiles will lose their crisp texture.
Another result of the freezing process, according to one source, is to spread the capsaicin throughout the chile. This occurs with the rupturing of the cell walls and can actually make some chiles seem hotter after freezing than they were beforehand. Research to date indicates that freezing chiles does not actually make them hotter. There is simply nothing that the freezing process alone can do, either physically or chemically, to increase the heat of a chile.
There are different requirements for freezing chiles, depending on the size of the chile. Large chiles may be frozen at any stage once they have been roasted. That is, they may be frozen before peeling (freezing actually makes them easier to peel), or after peeling and de seeding. They may be frozen whole or chopped.
The easiest way to freeze large chiles is to put them into freezer bags, double-bag them and place in the freezer. You can also wrap them in heavy foil or freezer wrap, or you can pack them in rigid plastic containers. A handy way to freeze chopped New Mexico green chile is in plastic ice cube trays. After the trays are frozen, the chile cubes can be popped out and stored in bags. The cubes can then be used when making soups or stews, or in other recipes, without having to pry apart blocks of frozen chiles.
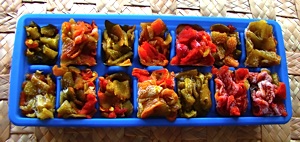
Chopped Frozen Chile in Tray
Smaller varieties, including habaneros, serranos, jalapeños, and Thai chiles can be frozen without processing. Just wash off the chiles and allow them to dry before freezing. Then place them on a cookie sheet or other flat surface, one layer deep, and put them in the freezer until frozen solid. They can then be stored in double freezer bags and will keep for nine to twelve months at zero degrees F. Sometimes they dry out a bit and need to be soaked in water during defrosting to rehydrate them. When chopped into a salsa, for example, few people can tell that they have been frozen. Some sources call for blanching fresh peppers first, but in our experience, this step is not necessary.
Fresh red chile paste can be stored in plastic containers or zip bags and frozen to use all year long. The paste holds up well in the freezer and really helps to cut meal preparation time.

