By Dave DeWitt and Paul W. Bosland
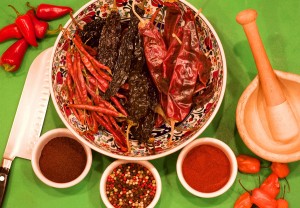
Drying is the oldest and most common way to preserve pepper pods and works well for most peppers—except for the very meaty ones such as jalapeños, which are smoke-dried and called chipotles (see below). To dry peppers, select those that have reached their mature colors, or are just starting to turn. If they are picked while still green, it is very likely that it will never turn the mature color. Avoid any pods that have black spots, because these will mold or rot. On dry days, the peppers can be placed on metal racks and set in the sun. Placing them on a surface that collects heat, such as a car hood or roof, accelerates the process. They can also be hung individually on a clothesline. Another method to use is a home dehydrator—just follow the manufacturer’s instructions. Jalapeños and several other chiles will dry well in a dehydrator. Cutting the thick-fleshed chiles in half, or into several pieces helps to speed up the process. Some of the larger growers use forced convection solar dryers, which reduces the time for sun-drying by 65 percent.
Dehydration also works for fresh New Mexican or poblano peppers which are first roasted and peeled (either green or red), and then placed in the sun to dry. Lay long strips of the peeled pods on nylon window screening, cover them with cheese cloth, and place them in semi-shady location with good air circulation. The more humid the climate, the more sun that should be applied to the drying pods. This process makes chile pasado (chile of the past, see below), which will turn an unappetizing dark color, brown or almost black. However, when the chile pasado is rehydrated in water for about 30 minutes, it regains its green or red color. One ounce of this chile pasado is equivalent to ten to twelve fresh pods.
Ristras and Wreaths
The long red ristras (strings) of New Mexican chiles are seen everywhere in that state in the early fall. They provide decoration, but are also the centuries-old method of drying long red peppers for later culinary use. To make a ristra, a supply of freshly picked, red (or just turning red) New Mexican chile pods is necessary; three-fourths of a bushel of chile will make a ristra about three feet long. Don’t bother using green chiles with the belief they will turn red. Many will be immature pods that will shrivel and turn a dull white. Ristras and wreaths can be made out of any elongated pods, so try making them with Cayennes or Mirasols.
Besides the pepper pods, a ball of lightweight cotton string and some baling wire or heavy twine is needed. The first step is to tie clusters of three pods together with the cotton string. Hold the three pods by their stems, wrap the string around the stems twice, bring the string upwards between two of the pods, and pull tight. Then make a half-hitch with the string, place it over the stems, and pull tight. Continue this process with sets of three pods until there are several clusters of pods tied to the cotton string, or until the weight of the pods makes the string difficult to handle. At that point break the string and start again, continuing until all of the pods have been tied into clusters of three.
The next step is to attach the clusters of pods to a stronger length of twine or wire. Suspend the twine or wire from a rafter or the top of a door and make a loop at the end to keep chiles from slipping off the end. Starting from the bottom, braid the pods around the twine in a manner similar to braiding hair. The twine serves as one strand and two pods in the cluster serve as the other two strands. As the pods are braided, keep the center pushed down to insure a tight fit, and be sure that the pods protrude evenly from the ristra. These days, some ristra-makers have resorted to using rubber bands to “tie” up the groups of three chiles, then slipping each group over a wire to form the ristra. This method is considerably faster than the traditional method; the downside is that the ristras tend to be a bit thin or skinny and last only as long as the rubber bands hold out.
One final method to make a ristra is to use a large needle threaded with string. Push the needle through the bottom of the stem where it widens out, pushing the chiles up tightly against each other. Again this tends to produce thin looking ristras, but this can be overcome by hanging several strings together. It is also a handy way to handle smaller chiles such as cayennes or piquins, which require a lot of time and dexterity to string in the traditional way.
To make a wreath, use smaller pods, such as cayennes and braid the pods around a straightened-out coat hanger and then bend the wire into a circle. When the braiding is completed, hang the ristra or wreath in full sun from a clothesline or rafter where there is good air circulation. The chiles should dry in the sun before the ristra is brought inside or else they may turn moldy and rot. Do not spray the ristra with lacquer to make it shiny–all that will do is make the peppers inedible. Dry red peppers have their own natural luster and do not need an artificial shine.
Making Chile Powders

When turning fresh pods into powders, use a food dehydrator to dry them out before grinding them. If they are dry enough to snap in half and not bend, then they are ready for grinding.
Although whole pods keep best because they best retain color and flavor, another way to store peppers is to grind them into powders. All dried chiles can be ground into powder–and most are, including the habanero. Remember, though, that chile powders oxidize more easily than pods, so the must be stored properly. Crushed chiles, or those coarsely ground with some of the seeds are called quebrado. Coarse powders are referred to as caribe, while the finer powders are termed molido. The milder powders, such as New Mexican, can also be used as the base for sauces, but the hotter powders such as cayenne and piquin are used when heat is needed more than flavor.
The pods should be dried and the seeds removed for more pure powder colors. A short-cut for drying pods that will be immediately turned into powder is to cut the fresh pods of any size in half, remove the seeds, chop them coarsely, and then microwave small amounts on low power until most of the moisture is gone. Place these microwaved pepper pieces in a food dryer or under the sun until they break when bent. They can also be dried in a 200 degree F. oven for six to eight hours. Remember that drying fresh peppers in the oven for long periods of time tends to darken them, and they have a tendency to lighten under full sun. The next step is to grind the peppers into powders. The fresher the powders, the better they taste, so don’t grind up too many pods. Use an electric spice mill and be sure to wear a painter’s mask to protect the nose and throat from the pungent powder. Many cooks experiment by changing the powders called for in recipes.
Adventurous cooks can experiment with creating powders of specific colors. For example, collect the different varieties of green, yellow, orange, red, and brown chiles and separate them into their respective colors. The colors of the powders vary from a bright, electric red-orange (chiltepins), to light green (dried jalapeños), to a dark brown that verges on black (ancho). The colored powders can then be combined with spices, as in our recipe for Chili Powder (this chapter), or they can be stored for later use. Another use for the powders is to turn them into green, yellow, orange, red, or brown chile pastes. Since some of the colors of the powders tend to be a bit dull, they can be brightened up by adding a few drops of the appropriate food coloring when making the pastes. In some kitchens, there are more powders available than the whole pods because the powders are concentrated and take up less storage space. Store the powders in small, airtight bottles.
Chile Pasado (Chile of the Past)
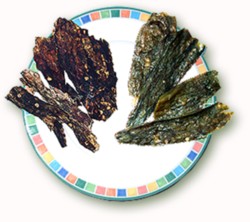
The most ancient method of preserving green chile before the advent of refrigeration and freezing is called chile pasado, or chile of the past. Chile pasado was roasted and peeled green chile that was dried in the sun. Since chile is ninety percent water, when that’s removed, the chile is lightweight and very easy to transport. The only problem with it is its appearance—it dries to an unappealing brownish or blackish color, although it rehydrates to a dark green. It is expensive, if you can find it, and this method has been replaced by using modern technology.
 Here is the way green chile was preserved before the invention of canning and freezers. This method assumes that you live in a dry climate like New Mexico or Arizona. If not, remove the stems from the chile and place the pods in a food dehydrator until brittle. You can place them in an oven set at the lowest heat possible, but you must monitor them carefully. There are about 10 medium-sized pods to a pound.
2 pounds New Mexico green chile pods (about 20 pods)
String
Roast the chile pods on a charcoal or gas grill until the pods blister and start to turn black, turning often. Remove them from the grill and place in a plastic bag with a wet paper towel for 1/2 hour. Remove and carefully peel the skin off, leaving the stem and seeds intact. Tie four pods together by wrapping string around the stems and place over a line outside in the sun. Do not let the chiles get wet by rain, and you can protect them from flies and other insects with by wrapping them lightly in cheesecloth. Drying time varies with humidity levels, but dry them until they are very dark and brittle. To store, break off the stems and place the dried pods in a zip bag and then place in a second zip bag. Place in the freezer for optimum results, especially if you live in a humid climate. Because they are brittle, breaking off the stems will sometimes cause the pods to break into strips and other pieces.
To reconstitute the pods, place them in a pot of boiling water for 1 minute. Remove from the heat and let stand for five minutes. Remove from the water and drain. Use them in any recipe calling for green chile in any form except whole pods.
Yield: About 3 ounces
Heat Scale: Varies but usually medium
Smoked Chiles

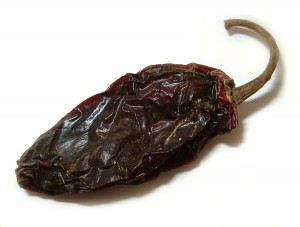
Chipotle Pod
Why did Native Americans smoke chiles in the first place? Perhaps some thick-fleshed chiles such as early jalapeños were dropped near the communal fire and later, a leathery, preserved chile was the result. Since smoking is believed (along with salting) to be one
of the earliest preservation methods, it would make sense that the “meaty” chiles could be smoked right along with the meat. In the town of Delicias in northern Mexico, red jalapeños are smoked in a large pit on a rack that can be made out of wood, bamboo, or metal. Another nearby pit contains the fire and is connected to the smoking pit by an underground tunnel. The pods are placed on top of the rack where drafts of air pull the smoke up and over the pods. A farm may have a smoker of a different design at the edge of the fields, and it may be a fireplace of bricks with grates at the top and a firebox below.
Traditional chipotle supplies from Mexico are often unreliable, of poor quality, and are sometimes difficult to get through Customs. Gale Carr, a farmer with a masters’ degree in business, runs the Chipotle Texas operation in the tiny town of Ft. Hancock near El Paso. He believes that American-made chipotles offering quality, consistency, and cleanliness will soon take over from the imports–-and he has the lab reports to prove the higher quality of his chipotles. “Basically, we are taking two by-products that nobody wants–red jalapeños and pecan tree trimmings–and turning them into a gourmet product,” he said. He dries the red jalapenos before smoking them, as that technique reduces the time for a finished product.
Chilehead hobbyists can smoke their own chiles, although the process is time-intensive. It is not difficult to make chipotles in the backyard with a meat smoker or Weber-type barbecue unit with a lid. The grill should be washed to remove any meat particles because any odor in the barbecue will give the chile an undesirable flavor. Ideally, the smoker or barbecue should be new and dedicated only to smoking chiles. The result of this type of smoking is a chipotle that more resembles the red morita than the classic tan-brown típico.
There are five keys to the quality of the homemade chipotles: the maturity and quality of the pods, the moisture in the pods, the type of wood used to create the smoke, the temperature of the smoke drying the pods, and the amount of time the pods are exposed to the smoke and heat. But remember that smoking is an art, so variations are to be expected and even desired.
Recommended woods are fruit trees or other hardwoods such as hickory, oak, and pecan. Pecan is used extensively in parts of Mexico and in southern New Mexico to flavor chipotle. Although mesquite is a smoke source in Mexico, we prefer the less greasy hardwoods. Mesquite charcoal (not briquets) is acceptable, especially when soaked hardwood chips are placed to top to create even more smoke. It is possible, however that the resinous mesquite smoke (from the wood, not charcoal) contributes to the tan-brown coloration of the típico variety of chipotle.
Wash all the pods and discard any that have insect damage, bruises, or are soft, and remove the stems from the pods. Start two small fires on each side of the barbecue bowl, preferably using one of the recommended hardwoods. If you are using a meat smoker with a separate firebox, simply build the fire in the firebox and smoke the chiles until they are pliable but not stiff.
Place the pods in a single layer on the grill rack so they fit between the two fires. For quicker smoking, cut the pods in half lengthwise and remove the seeds. Keep the fires small and never directly expose the pods to the fire, so they won’t dry unevenly or burn. The intention is to dry the pods slowly while flavoring them with smoke. If you are using charcoal briquets, soak hardwood chips in water before placing them on the coals, so the wood will burn slower and create more smoke. The barbecue vents should be opened only partially to allow a small amount of air to enter the barbecue, thus preventing the fires from burning too fast and creating too much heat.
Check the pods, the fires, and the chips hourly and move the pods around, always keeping them away from the fires. Be sure to stand upwind as you open the smoker; that smoke could be “hotter” than you think! It may take up to forty-eight hours to dry the pods completely, which means that your fire will probably burn down during the night and will need to be restoked in the morning. When dried properly, the pods will be hard, light in weight, and reddish-brown in color. Ten pounds of fresh jalapeños yields just one pound of chipotles after the smoking process is complete. A pound of chipotles goes a long way, as a single pod is usually enough to flavor a dish. After the pods have dried, remove them from the grill and let them cool. To preserve their flavor, place them in a zip bag and freeze them.
A quick smoking technique involves drying red jalapeños (sliced lengthwise, seeds removed) in a dehydrator or in an oven with just the pilot light on. They should be dessicated but not stiff. Then smoke them for three hours over fruitwood in a traditional smoker with a separate firebox, or in the Weber-style barbecue as described above. This technique separates the drying from the smoking, so you spend less time fueling the smoker.
Although jalapeños are the most popular chile for smoking, many people have started to smoke dry a variety of peppers including habaneros, serranos, and even yellow wax varieties. Experiment with your favorite varieties, and you will be in for a real treat.


