
 0
0
 0
0
Story and Photos by Harald Zoschke
Fiery Foods & BBQ Central Recommendations
Chile Pepper Bedding Plants... over 500 varieties from Cross Country Nurseries, shipping April to early June.
Fresh pods ship September and early October. Go here
Chile Pepper Seeds… from all over the world from the Chile Pepper Institute. Go here
Cultivating capsicums in your backyard is a lot of fun. My wife Renate and I have been growing peppers for more than 15 years. Every now and then, we discovered something helpful — tools that would make chile gardening easier, help prevent damage to the precious plants, speed up the growth process or improve results. While some of these cost money, others utilize cheap household articles, or even stuff that would otherwise go to the trash can. So here’s a selection of our gardening gadgets, from seed to harvest. Enjoy!
Preparing the Seed
The Saucer of Truth Germination Test
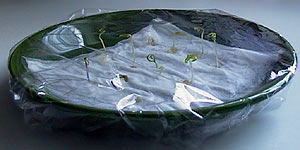 It makes sense to know the expected germination percentage for each chile variety, so you want to conduct a germination test first. Plan to do this at least four weeks before actually starting your seed. We like to use a damp paper tissue on a plate or saucer, covered with plastic wrap with some ventilation holes poked into it. This creates a similar environment as later in a grow box.Be sure to always moisten the paper before it goes dry, as this would ruin the test. Divide the number of sprouted seeds by the total number of seeds used to arrive at the approximate germination percentage.
Ice Cube Tray for Soaking Seeds
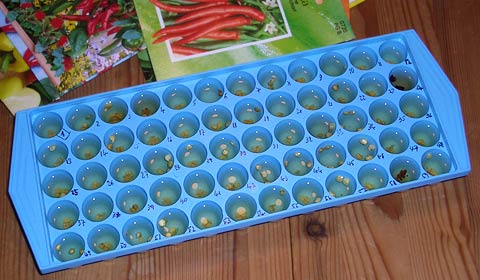 To increase germination, soak the seeds for 5 minutes in a 10 percent bleach solution, rinse well, and then plant. An alternative that we like is to use chamomille tea rather than bleach. The chamomille’s germ-killing properties seem to fight “damping off”, a disease that kills small seedlings, and it speeds up germination, too. Either way, if you have a bunch of pepper varieties, that soaking procedure can become quite tedious. Doing this sequentially, variety for variety, it would take forever. Doing it for all at once would require many containers. We found our solution at a pharmacy chain store: An ice cube tray with molds for 60 tiny “cubes”! With a permanent Sharpie pen, we wrote numbers next to each compartment, so we can soak small amounts of seeds for 60 varieties at once.
Cheap Signage
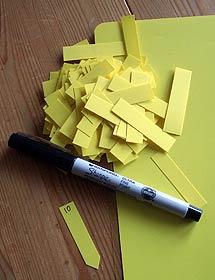
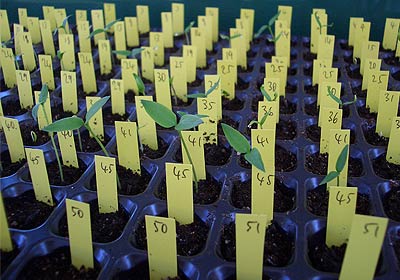 Pepper seeds are like luggage on the airport – many look alike, so it is important to but markers next to each variety right after starting the seeds. If you are like us and grow many varieties each year, signage is also a cost factor. Also, if your seeds are planted tightly, many store-bought markers are just too big. The solution: Get some light-colored plastic binders or plastic index divider sheets from your office supply store. Be sure to pick sturdy ones, i.e. not too thin. Using scissors, cut them in to 1/3 “to 1/4” (6 to 8 mm) strips and the desired length, cutting the bottom arrow-shaped.(see left picture above). Put names or numbers on with a waterproof felt pen like a thin-lined Sharpie®. Once you transplant your seedlings outside, use sturdier markers and save our seedling markers for next year (numbers make them more universal to re-use).
Heating Mats and Grow Boxes
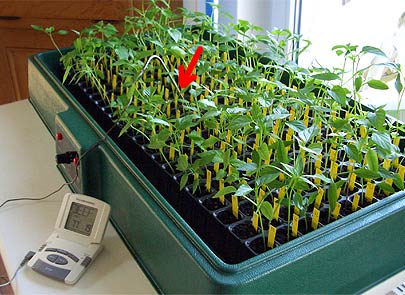
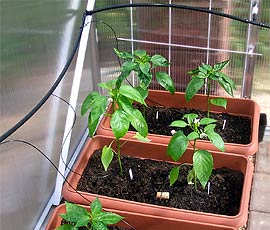
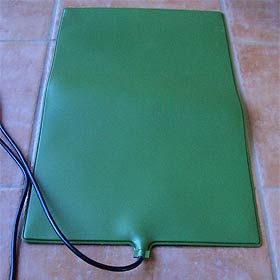 Chile pepper seeds need warmth and moisture to germinate and to start growing – see “Planting the Pepper Garden, Part 1: Selecting and Germinating Seeds. If you already own a grow box, a heating mat will help to keep a constistently high temperature. Don’t use grandma’s heating pad. She still needs it, it gets too hot, and it is probably not electrically safe for such long periods of operation. If you don’t have a grow box yet, consider buying an electrically heated one, also called electric propagator. We got a unit from manufacturer Parasene, see here, with more (UK) sources here . We got ours from a German gardener supply store named Beckmann, see here, but similar products should be available in the USA or elsewhere as well. Wherever you happen to live, be sure to check for correct voltage for use in your country). This grow box includes a heated, thermostat-controlled bottom and an aluminium framed top, so plants won’t hit the “roof” too quickly. The lid, which can be lifted off for easy access, incorporates two adjustable vents. See pic to the right, below.
Checking the Soil Temperature
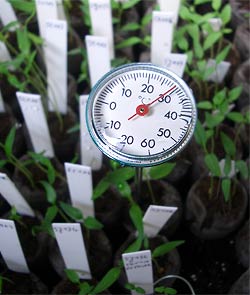
 Even with built-in thermostats and adjustable temperature, it is important to monitor and adjust the soil temperature. For optmimum germination and seedling growth, we like to keep the temp around 80F (27°C). Too cold soil can slow down germination almost indefinitely. First we used a mechanical thermometer from our kitchen. But as the grow box cover is often fogged, it was kind of hard to read. So we took the hi-tech approach, and now we’re using the digital remote unit we bought at Williams-Sonoma a few years ago. When growing seedlings, it’s not barbecue season anyways, so we don’t miss the thermo at the grill. One 1.5V battery keeps it going for months, continuously turned on.
Water Bottle as Mini Greenhouse
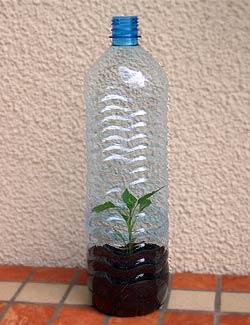
 Granted, those grow boxes don’t come cheap. If you’re on a tight budget, or if you have just a few plants anyway, you can build fancy mini “greenhouses” from empty water bottles that will fit any window sill. Or wow your coworkers by putting one on your desk! Using scissors or a sharp knife, cut the bottle about 4″ (10 cm) from the bottom and fill half of it with soil or another growing media (see also Planting the Pepper Garden, Part 2: Growing Seedlings). Put a 2″ (5 cm) lengthwise cut (see arrow) into the top to help putting it on the bottom part like shown in the pictures above. Be sure to remove the cap, as the plants also need oxygen. Don’t forget to poke some holes in the bottom to allow excess water to run off – peppers don’t like wet feet.
Recycle your Egg Cartons
Austrian chile gardener Joachim sent in this tip: He starts his seeds in egg cartons that he fills with soil (we recommend to sterilize the soil). By the time the seedlings are ready to transplant, the cartons are softened from watering, and the plants can be separated by cutting the carton segments with a sharp knife. Then the “pots” can be transplanted including their egg carton section, the cardboard will rot and eventually become compost – the roots will grow though it.
Transplanting Flexible Soil Tray
 When it comes to transplanting the seedlings to pots, you need to deal with potting soil. How can you do this without making a mess of your patio, your balcony, or even inside your house? A few years ago we found this handy little helper. Basically it is a piece of plastic-coated fabric, the stuff sturdy tarps are made off. Each corner has a press stud button, turning the flat fabric into a tray with a 3″ (7.5 cm) high rim. If not in use, the unit takes up very little space, but when in use, it keeps the dirt from spreading, keeping your place tidy. If you can’t find such a product, it is easily assembled from a piece of reinforced tarp, cut to size and equipped with either press stud buttons (available including fasteners at hardware stores), or pieces of heavy-duty Velcro® in each corner.
Prepping the Garden Site
Once the plants are in the field or in containers, it is important to get them the right soil for great peppers (for more information on soil, see “Planting the Pepper Garden” here and here. Besides moisture, nutrients and pH value (acidity) of the soil need to be right.
Soil Acidity (pH)
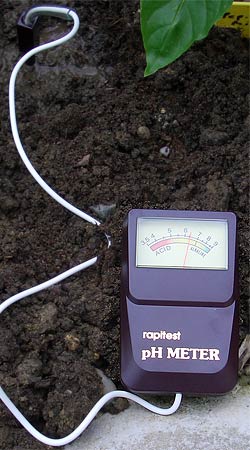 A pH Meter allows you to instantly determine how acidic or alkaline your soil is. Plants need the correct pH level which controls how well they utilize the nutrients available in your soil. For chiles, the optimum pH is 5.5 to 6.5. I purchased three different meters, two in the U.S., one in Germany. Rapitest® measures pH only (and comes with the best instructions), the other two units also have probes for moisture, one also for light (which I find useless). Neither unit needs batteries, and operation is rather simple. Simply push the clean probe into the moist soil and check the needle. When I tested the soil in our pepper patch, the results were amazingly accurate — all three units showed a pH of 6.3 to 6.5, i.e. no actions necessary here to adjust the pH. One shop that has the Rapitest unit is here, another one here (please note I am not endorsing any of these shops here – just found them using Google). Soil pH metersYou need to raise the soil pH to make it more alkaline, or to lower pH to make it more acid. A great site with tips how to adjust the soil’s pH if necessary can be found at the “Garden Helper” site here. Unfortunately these units can’t ve used to check the pH on hot sauce – unfortunately, way more expensive is required for testing liquids.Testing Soil NutrientsBesides pH meters, soil test kits with color indicators are another method of checking the acidity. Rapitest also offers such a soil test kit, available here, for example. The test includes only pH but also nutrients. Nutrients are the plants’ food for healthy growth. Especially Nitrogen, Phosphorus and Potassium (Potash) (N, P and K for short) play a vital role in plant growth. pH, and N/P/K nutrients can be checked with a chemical test that results in colors that can be checked against a color reference chart on the back of the package.Nutrients can be adjusted using an appropriate fertilizer – the contents are always listed as N, P and K percentages respectively on the package. A natural way to supply a balanced amount of nutrients is compost – see also Planting the Pepper Garden, Part 2.
Growing for Pure Seed
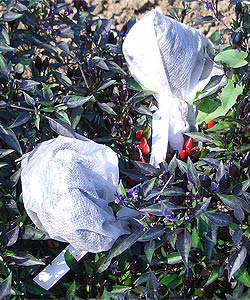 Chile plants are promiscuous and love to cross-pollinate with other varieties. If you want to collect pure seed of a variety for growing exactly the same peppers next year, you need to avoid cross-pollination. An inexpensive and easy way to accomplish this is the use of a special waterproof paper fabric. This can be done either on single branches or, especially in case of containers, on a whole plant, duck-taping the fabric to the rim of the pot. You can also use cheesecloth to make little tents around a branch to prevent the pollinating insects from reaching the flowers.
Protecting the Plants
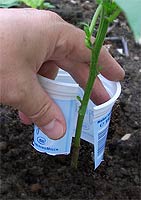 Some gardeners use beer traps to keep slugs from crawling up their pepper plants and munching on leaves and pods. I’d rather drink the beer myself and use empty yoghurt cups as barriers. Our slimy friends are having a hard time to overcome the edge. Cut off the bottom of each cup with scissors, and if the plants are already too huge to put on the collar from the top, cut it open legthwise, too. That way you can spread it a bit to put it around the stem. Then push it about 1/2″ (1.3 cm) into the soil. Lesson learned: Eating yoghurt can keep you healthy, and your pepper plants, too!
Irrigation Drip Control, No Batteries Required
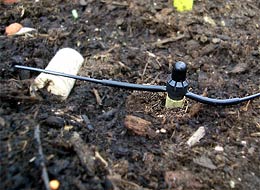 For the last two years, we have been using a quite clever irrigation system by Beckmann, a German greenhouse manufacturer. The system is called “BETA 8”, and here’s how simple it works: Thin PVC hoses connected to “main arteries” lead to valves that are plugged into the soil. These valves consist of a short wooden pipe that expands when moist, and contracts when dry. When expanding, the wood squeezes the piece of rubber hose shut. When the soil (and the wood) dry out again, the wood contracts, the rubber hose opens and lets water drip, just enough to cause the simple valve to close again. Clever, eh? Amazingly, that system works like a charm. And the big advantage is that no electricity and/or electronic controllers are required. Water supply and pressure comes from a 50 gallon rainwater barrel outside our greenhouse. I am not sure if this system is already available outside Germany, but here’s Beckmann’s Web shop (menu option “Bewässerungs-Systeme”). For more detail pictures of this ingenious irrigation system, see my German Pepperworld article here.
Post-Harvest Roasting of Small Amounts of Peppers
New Mexican types and some other peppers are best when roasted and peeled. Special rotating roasters with powerful propane burners are used for that throughout the U.S. Southwest — see my Hatch Chile Festival Report for such a unit in action. For smaller amounts, my trusty old Weber gas grill does just fine – we remove those “Flavorizer®” bars and insert a lower grid to put the peppers on, turning them after a while. But sometimes it’s just one or a few pods that need to be roasted. Then a gas torch from the hardware store comes in handy (left picture), or a creme brulee gas torch. Those chef’s torches can be found in cooking supply stores, like this unit here at Williams-Sonoma. Always use grill tongs so you’ll blister only the peppers and not your hands.Although we live in Germany, we often enjoy New-Mexican-style breakfast on Sundays. We can get tortillas here, and to have our “breakfast portions” of roasted peppers handy, we roast and peel those Big Jims, Sandias etc. that we grow, chop them up and freeze them in ice-cube trays. That way it is easy to take just as much as we need. We freeze chopped cilantro the same way.
Deseeding the Easy Way
Around harvest time in our little pepper garden, one of our all-time favorites is cheese-filled, bacon-wrapped jalapeños, baked in the oven. Just cut the pods lengthwise, remove the inner walls and seeds, fill both halves with shredded cheese, put them together again, wrap with sliced bacon and bake for about half an hour. Removing the inside from the jalapeño pods used to take forever until we found out that an apple corer is the right tool for this job. Get one, they’re cheap and work fine for all mid-sized peppers.That’s all about our secret pepper garden gadgets for now—hopefully, some of them found your interest and will help you, too. And if you are using a cool tool yourself not yet presented here, don’t hold back. I’d love to expand this article with your ideas!
00