
 0
0
 0
0
by Dave DeWitt, Nancy Gerlach, and Jeff Gerlach
Photography by Steve Tesky
Food Styling by Denice Skrepcinski
|
One of the best ways to handle an overwhelming chile crop is to pickle them. Pickling the peppers will preserve them at least until next year’s crop comes in and makes “almost” fresh chiles available throughout the year. They can be pickled by themselves or in combination with other chiles or other vegetables. With just a little imagination, it’s easy to turn out attractive, multi-colored jars of pickled peppers. And, although pickling does require some time at the stove, it’s an easy way to put up a lot of chiles.
|
 |
Recipe Index
|
“Traffic Light” Pickled Peppers Pickled Green Chile Pickled Habanero Chiles Sun-Cured Pickled Jalapeños Harvest Bounty |
Summer Squash Pickles Spicy Preserved Onions Pickled Green Beans Jalapeños in Escabeche Preserving Peppers in Alcohol |
Pickling Rules
There are a few basic rules to follow when pickling:
-
Sterilize jars and lids in a boiling water bath for 10 to15 minutes. We generally bring a large pot to a boil with an inch or two of water, along with a folded dish towel on the bottom of the pot. Jars are then placed, mouth down, into the water, along with the lids which can just be set between the jars. We then turn down the heat just enough to keep the pot slowly boiling or simmering.
-
Use pickling salt, rather than table salt which contains undesirable (for pickling) additives. Pickling salt is free of the additives that turn
pickles dark and the pickling liquid cloudy. -
While cider vinegar is more flavorful, 5 to 6 percent distilled white vinegar should be used to avoid discoloring the chiles. Note that we do use cider vinegar when discoloration is not a problem.
-
Do not boil the vinegar for a long period of time as that will reduce the acidity.
-
Poke or cut a hole in each chile to keep it from floating and also to allow the pickling solution to work into the entire chile.
-
After filling each jar, remove any trapped air with a spatula or knife blade inserted between the chiles and the wall of the jar, or by gently tapping the jar.
-
After processing in a boiling water bath, remove jars to a draft-free location and allow to cool for 12 hours before handling.
The Jars and Bottles
Alert readers will notice that our pickled peppers are presented in very unique bottles. But these are not the bottles we recommend for the pickling process. The pickling bottles should be the wide-mouthed Ball jars that are commonly used in putting up vegetables. For presentation as gifts or during a party, they can be transferred to the more unusual jars and bottles. Make sure that they are refrigerated after they are transferred.
Of ten you can find unique jars and bottles at import stores like Pier One and Cost Plus. But while planning out the photo shoot for this article, food stylist Denice Skrepcinski gave us some hints about where to find some of these beautiful bottles really cheap. She haunts discount stores like T.J. Maxx, Ross, and Marshall’s and looks in their housewares section. Often she finds heavily discounted jars of pickled products such as onions, peppers, and olives. Some other bottles contain flavored oils or vinegars. One unique triangular bottle was stuffed with vertical slices of carrots and popcorn! Denice was only interested in the bottles, of course, and recommends that you not consume any of the foods that don’t have an expiration date on them. The discounts were considerable–one 8-inch tall bottled of pickled onions and olives had a price sticker that read: “Compare at $24.00–$12.99.” A sticker below showed the price reduced to $3.00. Three bucks for the jar plus chiles you’ve grown yourself makes for an attractive, inexpensive gift!
The great thing about these attractive bottles is that you can layer the chiles into stunning patterns. Note in the photos how Denice layered the Harvest Bounty and the different colored chiles in the vertical bottle to make a “traffic light.” So use your imagination and make some beautiful pickled peppers.
Discolored Peppers
There are three methods of preserving or canning chiles: using vinegar and pices, processing in a pressure cooker, and placing the jars in a boiling
water bath. Pressure canning and processing in a boiling water bath will often “cook” the chiles. We do not recommend canning chiles, as they are a low-acid fruit. For a crisper chile, follow these directions for pickled chiles. The vinegar used when pickling will prevent bacterial growth.
Fill the jars to the top with the pickling liquid, leaving no head space. With all methods you must sterilize the jars before preserving. If you have any doubts that a preserved product is good, DO NOT taste, just discard. Finally, you cannot prevent the chiles from losing color when pickling; it is a chemical reaction involving the solubility of chlorophyl in the vinegar.
For More Information
Check out the links for canning and pickling here at FoodSafetySite.com.
“Traffic Light” Pickled Peppers
 |
This recipe for approximately 2 pounds of peppers works well with jalapeños, serranos, yellow wax, cherry, habanero, or peperoncini chiles. So if you’re a lover of pickled peppers, mark this recipe as you’ll be using it a lot. In the photograph, variously colored chiles have been layered to resemble a traffic light. Note: This recipe requires advance preparation and does not have to be processed in a water bath.
|
Brine:
-
3 cups water
-
1 cup pickling salt
-
Combine the salt and water and cover the chiles with the mixture.
-
Place a plate on the chiles to keep them submerged in the brine.
-
Soak the chiles overnight to crisp them. Drain, rinse well, and dry.
Pickling Solution:
-
3 cups water
-
3 cups 5 to 6 percent distilled white vinegar
-
3 teaspoons pickling salt
-
Poke a couple of small holes in top of each chile and pack them tightly in sterilized jars leaving 1/4 inch headroom.
-
In a pan, combine the water, vinegar, and salt. Bring the solution to a boil and pour over the chiles, leaving no head space. Remove trapped air bubbles.
-
Store for 4 to 6 weeks in a cool, dark place before serving.
Yield: 4 pints
Heat Scale: Varies
These chile strips are great on sandwiches or when chopped and mixed with salads such as tuna or shrimp.
Note: This recipe requires advance preparation.
-
½ cup white vinegar
-
½ cup sugar
-
1 teaspoon salt
-
1 teaspoon dill seed
-
1/2 teaspoon mustard seed
-
8 to 10 green New Mexico chiles, roasted and peeled, cut in strips (see chapter 2 for roasting and peeling instructions)
-
3 cloves garlic, cut in slivers
-
Combine the vinegar, sugar, and spices in a pan and simmer over low heat for 5 minutes.
-
Put the chile into small, sterilized jars, cover with the liquid and add some garlic to each jar.
-
Cover tightly and refrigerate for 3 days before using.
Yield: 2 pints
Heat Scale: Medium.
To insure the best pickled chiles, choose only the freshest ones and those with no blemishes. Bruised fruits will produce “mushy” chiles. You can also soak the chiles overnight in a brine of 3 cups water and 1 cup pickling salt to crisp them before pickling. Be sure to rinse them well to remove excess salt before processing. Note: This recipe requires advance preparation.
-
3 dozen fresh habanero chiles or enough to fill the jars
-
2 sterilized pint jars
-
Pickling Solution:
-
3 cups 5 to 6 percent distilled white vinegar
-
3 cups water
-
1 ½ teaspoons pickling salt
-
Poke a couple of small holes in top of each chile and pack them tightly in sterilized jars leaving 1/4-inch head space.
-
Combine the vinegar, water, and salt. Bring the solution to a boil and pour over the chiles. Remove trapped air bubbles by gently tapping on the sides of the jars. Add more of the pickling solution if needed; close the jars.
-
Store for 4 to 6 weeks before serving.
Yield: 2 pints
Heat Scale: Extremely Hot
These pickled chiles have an East Indian flavor because of the mustard seeds and ginger. Any small green chiles can be substituted for the jalapeños. Serving Suggestions: Serve these unusual chiles on sandwiches, hamburgers, or as a side relish for grilled or roasted meats.
Note: This recipe requires advance preparation.
-
1 cup jalapeño chiles, stems and seeds removed, cut in 1/4-inch strips
-
1 tablespoon coarse salt
-
1 tablespoon mustard seeds
-
1 teaspoon cumin seeds
-
1/4 cup oil, peanut preferred
-
1 teaspoon chopped fresh ginger
-
1/4 cup freshly squeezed lemon juice
-
Sprinkle the chile strips with the salt; toss and let them sit for 10 minutes.
-
Toast the mustard and cumin seeds on a hot skillet, stirring constantly, for a couple of minutes until the seeds begin to crackle and “pop.”
-
Heat the oil to 350 degrees F., remove from the heat, stir in the ginger, and let it simmer for 2 minutes. Remove the ginger and discard.
-
Stir in the chiles, cumin seeds, lemon juice, and pack in a sterilized jar.
-
For 5 days, set the jar in the sun in the morning on days when it is at least 70 degrees, and bring it in at night. Shake the jar a couple times each day.
Yield: 1 pint
Heat Scale: Hot
 |
This recipe can be used for pickling a combination of vegetables including chiles and bell peppers. Choose whatever mixture you desire, as well as the amount and type of chiles, and arrange them attractively in a jar before covering with the pickling solution. Be aware that some vegetables such as olives and mushrooms absorb capsaicin well and can become quite hot.
|
Note: This recipe requires advance preparation.
-
Chiles: yellow hots, jalapeños, serranos
-
Cauliflower, broken in flowerets
-
Broccoli, broken in flowerets
-
Zucchini, unpeeled and thinly sliced
-
Carrots, cut in coins or use baby carrots
-
Pearl onions, peeled and left whole
-
Garlic cloves, whole
-
Small button mushrooms, whole
-
½ part water
-
½ part vinegar
-
1 teaspoon salt per pint of liquid
-
Wash the chiles and prick with a toothpick. Arrange your choice of vegetables and chiles in sterilized jars.
-
Bring the water, vinegar and salt to a boil and allow to boil for one minute. Pour over the vegetables, leaving no head space, and cover.
-
Allow the mixture to pickle for at least 2 to 3 weeks in a cool, dark place before serving.
Yield: Varies
Heat Scale: Varies
This recipe calls for zucchini, but yellow squash or cucumber would work just as well.
-
1 pound fresh zucchini, unpeeled and cut in thin slices
-
2 white onions, thinly sliced and separated into rings
-
1/4 cup salt
-
6 small hot fresh chiles, such as serrano or cayenne, stems removed, cut in half
-
½ cup cider vinegar
-
½ cup lemon juice, fresh preferred
-
4 cloves garlic, sliced
-
2 tablespoons sugar
-
2 teaspoons celery seed
-
2 teaspoons yellow mustard seeds
-
1 teaspoon dry mustard
-
Place the squash and onions in a colander and sprinkle with the salt and let sit for 1 hour. Rinse well and drain.
-
Pack the vegetables into sterilized jars along with the chile.
-
Combine the remaining ingredients in a pan, bring to a boil and pour over the vegetables, leaving 1/4-inch head space. Adjust the lids and process in a boiling water bath for 10 minutes.
Yield: 2 pints
Heat Scale: Varies
Spicy onions are a welcome change from plain ones. Serve with sandwiches, hamburgers, hot dogs, or as a condiment. They are especially good with tacos and fajitas. Note: This recipe requires advance preparation.
-
3 pounds white onions, thinly sliced
-
1 small carrot, peeled and thinly sliced
-
6 serrano chiles, stems removed chopped, or substitute other hot fresh chiles
-
Pickling Mixture:
-
3/4 cup white vinegar
-
3/4 cup water
-
1/4 cup sugar
-
10 whole black peppercorns
-
6 whole cloves
-
Pour boiling water over the onions and carrots and let sit for 1 minute. Drain and layer in sterilized jars along with the chile.
-
Bring the remaining ingredients to a boil in a pan and pour over the onion mixture, leaving no head space, and cover.
-
Allow to the onions to marinate for a couple of days in a cool, dark place before using.
Yield: 4 pints
Heat Scale: Mild
Putting up chiles with other prolific vegetables such as green beans, takes care of two “too many” crops at one time. These spicy beans are a great addition to an appetizer tray. Note: This recipe requires advance preparation.
-
2 pounds fresh green beans, left whole
-
12 fresh red chiles, left whole, such as de arbol, cayenne or Thai
-
6 cloves garlic, left whole
-
1 cup chopped onions
-
1 ½ tablespoons dill seeds
-
2 teaspoons black peppercorns
-
3 cups white wine vinegar
-
1 cup water
-
2 tablespoons sugar
-
½ teaspoon salt
-
Trim the ends off the beans and remove the strings. Cook the beans in boiling water until barely tender, 3 to 5 minutes. Drain and plunge beans into ice water to stop cooking.
-
Stand the beans up in sterilized, wide mouthed jars. Divide the chiles, garlic, onions, dill, and peppercorns among the jars.
-
Combine the vinegar, water, sugar, and salt in a pan, bring to a boil, and pour over the beans.
-
Seal the jars and allow to sit for a couple of weeks in a cool, dark place before serving.
Yield: 6 pints
Heat Scale: Varies
Escabeche means “pickled” in Spanish, and this recipe is a way of pickling chiles that is popular in Mexico and other Latin countries. This particular method requires that the peppers be cooked and packed with several other vegetables. A variety of small hot chiles can be used, so don’t limit yourself to only jalapeños. Note: This recipe requires advance preparation.
-
1 pound jalapeños, whole
-
1/4 cup olive oil
-
1 medium onion, thinly sliced
-
2 small carrots, thinly sliced
-
4 cloves garlic
-
12 whole black peppercorns
-
1/4 cup salt
-
3 cups white vinegar
-
3 cups water
-
In a pan, saute the chiles in the oil until the skin starts to blister. Add the onion and carrots and heat for an additional minute.
-
Pack the chile mixture into sterilized pint jars leaving 1/2 inch head space.
-
Add a clove of garlic, 3 peppercorns, and 1 teaspoon salt to each of the jars.
-
In a pan, combine the vinegar and water and bring to a boil. Pour over the chiles.
-
Seal and process the jars in a boiling water bath for 15 minutes.
-
Store for 4 weeks in a cool, dark place before serving.
Yield: 4 pints
Heat Scale: Medium
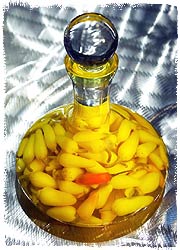
Another method of “pickling” chiles is to preserve them in liquor. This method has several advantages to it, including the fact that the process can be completed without using the stove. Also, alcohol tends to change the chiles less than vinegar. Simply cut or poke a hole in each chile and cover with your preferred liquor. Vodka, gin, vermouth, and rum all produce tasty results. Not only does this process preserve chiles, it also produces some very interesting drinks!
00