

 0
0
 0
0
Recipes:
Words and Photos by Mark Masker
Model: Lexus “Pepper” Shaffer
Usually when I play with wood, it doesn’t involve vegetables. Moreover, most times I finish in less than a month. Making this solar pepper dryer, though, was a notable exception to both. Part conversation piece, part raisin maker, the box dryer is a cheap way to dry vegetation without sucking juice from a power grid. I swear some of my neighbors thought I was building a coffin when I started. Glaring at them and nodding my head did little to discourage this, but I’m kind of twisted like that.

Lexus “Pepper” Shaffer
I could have just hit a local appliance shop and picked up one of those plug-in kitchen dryer thingies, but they’re hard to pimp out and a higher power bill means less cash for the little comforts like strippers and bail. Since the box is a lot bigger than a tabletop dryer, I can also fit a lot more food on its 16×36-inch rack than you can cram into an electric. And who doesn’t like a 36-inch rack? The box dryer is also more organic, since you can’t get more natural than, um, sunlight. On the downside, though, you need either a fully cloudless day (8-10 hours with an internal temperature of 100 to 140 degrees F is recommended) or a few days of in-and-out-of-the-dryer (under less than optimal conditions) to make this baby work.
This solar dryer is basically a wooden box full of rocks that draws cool air in through the bottom where it’s heated by the stones and sunlight. The warmed air then rises up through a rack of peppers (or other flora), taking the moisture with it as the hot air exits through the top. The dryer has a lid with a clear plastic panel that focuses sunlight into the rocks while insulation along the walls and the stones underneath trap the resulting heat.
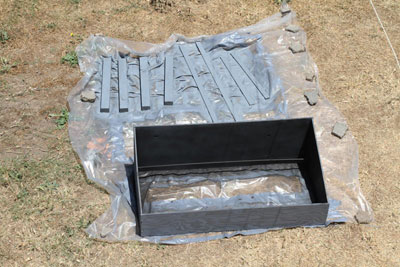
Building it is a pretty straightforward affair. You’ll need some basic tools to make it happen (cordless drill with a selection of bits and screwdriver attachment, a thick black marker, box cutter, miter saw, heavy-duty stapler, and wire cutters). I wanted it to complement the black-and-red trash can smoker in my yard (read how to make one here), so I painted the box to match. If you go that route, you’ll also need masking tape and masking paper.
You can build the box whatever size you want, but I recommend a ratio of 2:1 (length to width). Mine is 2×4 feet—big enough to dry a lot of peppers, but not quite big enough to hold a body unless you plan on drying a midget. Here’s a supply list of what you’ll need:
- 1-inch wood screws (box)
- .75-inch bolts and nuts (x50)
- .7mm plastic sheeting (2×4 feet)

- 3×24-inch wood legs (x4)
- 2×24-inch wood slats (x4-5)
- 2×48-inch slats (x4)
- 24×24-inch plywood (x2; .5-inch thick)>
- 24×48-inch plywood (x1; .5-inch thick)
- 8×48-inch plywood (x1; .5-inch thick)
- Brass hinges (x2)
- 3-inch hook latch (x1)
- 16×36-inch plastic-coated wire mesh
- 24×48-inch metal grate or chicken wire
- Paint primer (x1-2 spray cans)
- Black paint (x2 spray cans or more)
- 24×48-inches of fist-sized rocks (preferably dark)
- 16×20-inch aluminum roasting pans (x2)
- 10×10-inch aluminum roasting pans (x6)
- 1-inch screw-in metal hooks (x8)

- A bunch of scrap paper, sand, or coconut husks
Home Depot can handle the straight cuts on the lumber for you, but you’re on your own for the angled cuts. You want the dryer’s angle to match the latitude of its location for optimal sun exposure. If you live at 34 degrees latitude, the angle needs to be 34 degrees. Figure that out here. Snag a kid’s geometry supplies and you should be able to measure the angle properly. Once that’s cut, I like to set all my lumber out on plastic and lay down primer. Paint is the reason why this thing takes so long to make; you have to wait a week for the primer to cure, and then repeat the process with the black paint. Yes, I know, that’s two weeks—mine took longer because of the flame job on the frame and legs—but trust me, it’s worth it.
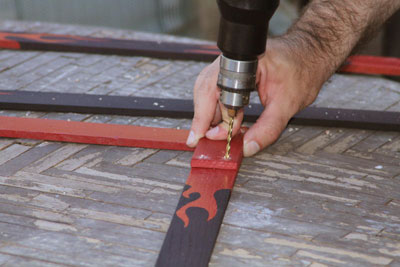
 Before spraying on the black, I took a black marker and marked off where I needed to do my drilling. I used three #6 wood screws per side to mount the front of the dryer to the sides, and four screws per side to mount the back. I also installed two of the 24×48-inch slats inside the dryer, one 2.5 inches from the back board, the other 3 inches from the front. These will hold the hooks for the vegetable rack later on. The 2.5-inch spacing gives me enough space to install the insulation without having the rack too far away from it. The slats are 4 inches up from the bottom to keep the peppers close enough to the rocks to dry without burning. I also took one of the hooks and used it to cut pilot holes on each slat at 10-inch intervals.
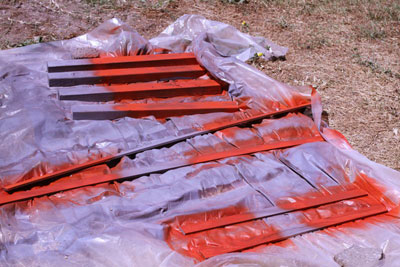
If you like the “pimped” look then let the legs and lid dry for a week. Wrap the red leg ends in masking paper, apply blue masking tape, and draw flame patterns on the tape. Cut away the excess tape and paint the remaining exposed legs black to match the main box.
After assembly, it’s time to finish painting. The box, rocks, and the insulating pans have to be painted black so as to better trap the sun’s heat. It takes about three coats on the inside and outside of the box frame to get it right, letting each coat dry a few minutes before spraying on the next. A week later, you’re free to continue the job.
Although the box has to be black, the legs’ job is to support the dryer, let cool air in through the bottom, and look good doing it. I took a little creative license with them and the lid’s frame. While the box cured, I gave the legs and frame some healthy doses of red.
That adds a third week of curing paint…but that’s no excuse to slack off. I mounted the aluminum pans inside the box using the three-quarter-inch nuts and bolts, leaving one top corner on each box open so I could stuff it with insulation. Sand, 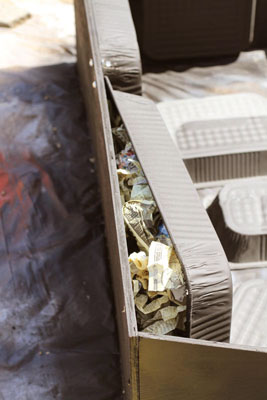 , and coconut husks all work great for insulation but I didn’t have a beach, sawmill, or tropical island on hand. What I did have was a brand new phone book that was left on my doorstep earlier that week. Seeing as how I don’t live in a cave, or in the 1980s, a phone book is pretty useless to an online geek like me, so I let my fingers do the walking (and tearing, crumpling, and stuffing). It takes about 20 pages to stuff the four small pans along the front and sides; the bigger pans take 50. Once a box is full, install the remaining nut and bolt, and then bolt the bottom lip into place. You’ll have to cut the small pans horizontally and make the two halves overlap in order to shrink the front pans down to fit.
Congrats—the top work is a done deal. Time to invert this baby and add the chicken wire for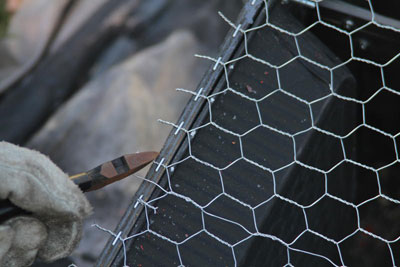 the rocks. You want a framework that’s strong enough to hold all the rocks, but perforated enough to let in plenty of air. Metal grating is perfect for this since it’s plenty sturdy. However, I saved a few bucks by using chicken wire and a 2×24-inch support brace between the front and back. My heavy-duty stapler made short work of mounting one side, making it easy for me to unwind the chicken wire across the frame and staple it down nice and tight along the way. You don’t want the wire sagging, so make it as taut as you can. Use the bolt cutters to snip the excess wire and use them to fold the stray wire bits back in to minimize sharp edges.
The cross brace comes next. Mount the L-brackets to either end, and then drill holes in the bottom of the frame at its center, using the L’s as a template. It bolts right up after that. 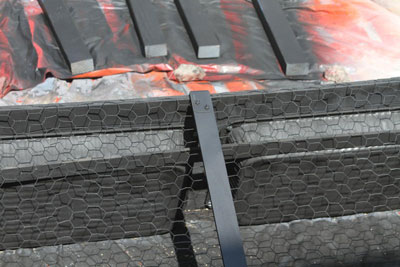 While the box is upside down, attach the legs. I took each finished leg and marked a little spot 12 inches up from the bottom of it to make sure all four would be level. The two front legs have to be trimmed 4 inches in order to be level with the lip of the dryer. You don’t want anything casting a shadow on the lid during the day. I used the dryer’s corners as levels to make sure the legs were at the proper angle and busted out the 1-inch wood screws to mount them along the sides, not under the dryer. I went from the outside in because the legs are thicker than the sides.
 Things should be looking pretty good at this point. Flip that baby back onto its feet, and then add the screw-in hooks for the veggie rack and placed your rocks on the chicken wire. The directions call for fist-sized rocks, and I could have shelled out twelve bucks for the stones, but instead I grew a pair of my own and put in the time to find free
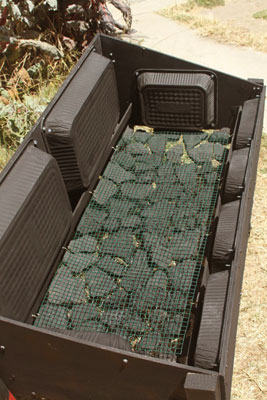 ones—concrete bits from the local industrial area that I schlepped back home. When that’s done, add the plastic-covered wire mesh for holding the peppers.
Lid time. With the paper and tape off the lid frame pieces, take the last 2×24-inch slat and cut four 4-inch lengths from it. I painted them red and used each to join the short and long sections of the frame as shown; bolting them beneath the slats would have looked better but I want the frame to  form an even seal all around, so I bolted them to the top instead. Finish the lid by flipping it over and stapling .7mm-thick plastic sheeting tightly across the framework.
Once you have the lid lined up with a slight crack along the top, install brass hinges along the front of the dryer and the lid. That crack along the top? It lets hot air carry the moisture out so it doesn’t collect on the plastic and fall back on the food, which would fully suck. A simple hook clasp across the top, and you’re ready to go.
Someone forgot to tell the sun that it’s summertime in Los Angeles. I had to wait two weeks for a hot, cloudless July day for my test run. You want to angle the dryer southwest and keep it away from buildings
  that cast big shadows. The idea is to get the best exposure you can.
Here’s where I was come day’s end. My sun catcher obviously worked, but not as fast as the original directions said it would. Maybe that’s because of the steady breeze that blew all day. It’s also possible the box needed a little more insulation along the sides but since the veggies were placed, but I’m thinking “no.” I put my hand over the top clasp and felt heat and moisture escaping, so the box was obviously doing its thing.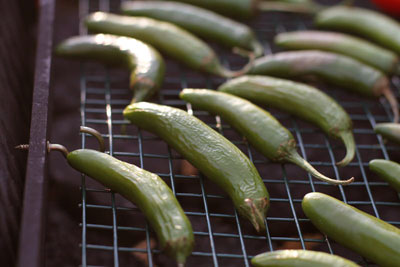
Day two: The food got a lot drier but not fully so. Truth to tell, drying food in a dehydrator or in your oven on the lowest setting would probably be more efficient for drying whole peppers and fruits. However, the outdoor version works extremely well with sliced foods. I found that out when I dried some mango in it the next day. Plus, your indoor oven won’t look this badass.

Mark Masker is a freelance journalist based out of Los Angeles. Fifteen years ago he fooled the motorcycle industry into thinking he could write and shoot photos. He’s now trying that same trick with the culinary arts.

- 4 ounces sun dried tomatoes
- 2 tbsp chopped fresh basil
- 2 tbsp bone-in pork chops, trimmed and fat scored
- 1 tbsp finely chopped garlic
- 1/4 cup chopped pine nuts
- 3 tbsp chopped onion
- 1/4 cup balsamic vinegar
- 1 tbsp tomato paste
- 1/3 cup crushed tomatoes
- 1/4 cup red wine
- 1/2 cup red chile pepper oil or olive oil
- 1/2 cup grated Parmesan cheese
- Place the sun-dried tomatoes in a bowl and cover with warm water for 5 minutes, or until tender.
- In a food processor or blender combine the sun-dried tomatoes, basil, parsley, garlic, pine nuts and onion; process until well blended. Add vinegar, tomato paste, crushed tomatoes and red wine, and process.
- Stir in the olive oil and Parmesan cheese. Season the mixture with salt to taste.

- 2-3 large sliced mangoes
- 1 tbsp cinnamon
- 1 tbsp Chile Powder
- 1 tbsp sugar (optional)
- Mix the sugar and spices, then spread the mixture onto a cookie sheet. Coat the mango slices evenly, then place in the solar dryer until dry (at least five hours).

- 4 each red dried chile peppers (Asian preferred)
- 2 each oranges
- 1/4 cup light molasses
- 1 tbsp soy sauce
- 2 tsp cornstarch
- 3/4 cup flour
- 1/2 tsp salt
- 1/4 tsp baking powder
- 3/4 cup water
- 1 lb boneless, skinless chicken breast cut into 1-inch cubes
- 1 tsp chile oil
- 2 cloves minced garlic
- 1 1/2 tsp chopped ginger
- 2 cups cooked white rice
- 3 cups vegetable oil
- Zest one of the oranges. Be sure to remove only the colored part of the skin. Avoid the white pith unless you like a nasty bitter aftertaste in your food.
- Juice the oranges and combine the OJ with the molasses, soy sauce and cornstarch in a small bowl.
- Heat the three cups of vegetable oil in a wok over medium-high heat until the oil hits 375°F on a deep fry thermometer.
- Combine the flour, salt, and baking powder in a medium bowl. Whisk in the water to form a smooth batter. Coat the chicken with it evenly.
- Cook the battered chicken in thirds for four minutes or until the chicken is golden brown and no longer pink in the center, stirring occasionally to break up pieces with spoon.
- Remove the chicken with a slotted spoon to a tray lined with paper towels.
- Pour off all the oil in the wok.
- Reheat the wok over medium high heat until hot; add the chili oil, orange zest, dried chili peppers, garlic and ginger. Stir-fry for about thirty seconds to a minute or until fragrant.
- Stir the cornstarch mixture, and add it to the wok. Cook until sauce boils and thickens. Return c hicken to wok, and mix well. Serve over rice.
00